Docker 学习系列(二): Building images
如何使用 Docker 构建镜像并发布?
镜像的相关概念
从官方文档可以得到如下信息:
Container images are composed of layers. And each of these layers, once created, are immutable.
可知,我们这里说构建镜像实际的就是对 layer 进行操作。这里的 layer 是什么?我们继续浏览官方文档。文档中给出了定义如下:
Image Layers: Each layer in an image contains a set of filesystem changes - additions, deletions or modifications.
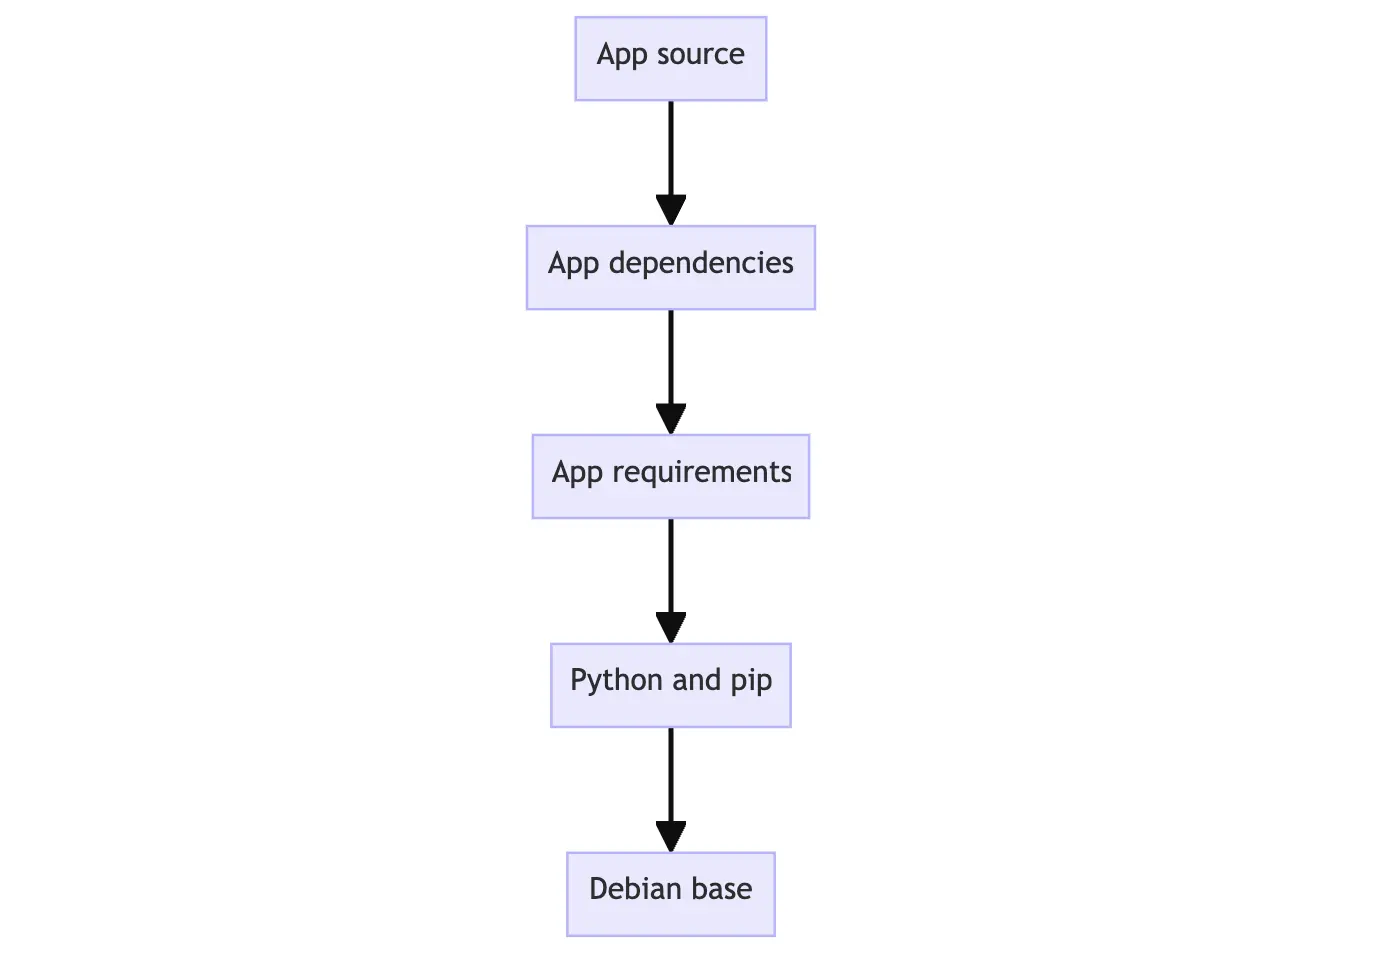
为了说明该定义官网还举了一个示例说明,以下是我的理解:
 它的构建过程如下:
- 第一层添加些基本工具如 ls, cat,apt(包管理工具)。
- 第二层安装编程语言的运行时环境和依赖管理工具。如果是 Python 项目,既需要安装 Python 的运行时环境以及对应的依赖管理工具 pip。
- 第三层从应用程序的工作目录下复制一些必要的配置文件。如 Python 项目需要使用
requirements.txt来指定当前应用程序需要用到的依赖库。 - 第四层根据第三层复制的配置文件为应用程序安装必要的依赖文件。
- 第五层将应用程序的源代码拷贝到当前的镜像中。
这五层可以分为两个阶段: 一是开发环境/运行环境搭建;二是安装应用程序源码及构建应用程序。 而这样分层存储的好处是使 layers 可以在不同的镜像中复用。例如, Image1 和 Image2 同为Python项目,它们使用的开发环境(主要指操作系统和 Python 版本)一致。如果 Image1 又先于 Image2 在本机上测试。 Image2 可以复用 Image1 中关于描述开发环境的 layer。
官方文档中描述原理的部分请看 Stacking the layers
有关 docker commit 的实践部分就不在这里详述了,具体请跟着官方文档操作一遍即可理解。
Dockerfile 是什么?
有了解过 CI/CD 这一工程实践的经验。在看 Dockerfile 就会轻松许多。Dockerfile 本身就是一个指令的集合。其中 Docker 会根据当前 Dockerfile 中定义的指令按顺序执行。具体我们来看官方的描述:
A Dockerfile is a text-based document that’s used to create a container image. It provides instructions to the image builder on the commands to run, files to copy, startup command, and more.
Dockerfile 的构成元素 - 指令
以下是 Dockerfile 中比较常见的指令,更详细的请浏览官方的 reference
From <image>- this sepcifiex the base image that build will extend.WORKDIR <path>- this instruction specifies the “working directory” or the path in the image where files will be copied and commands will be executed.COPY <host-path> <image-path>- this instruction tells the builder to copy files from the host and put them into the container image.RUN <command>- this instruction tells the builder ot run the specified command.ENV <name> <value>- this instruction sets an environment variable that a running container will use.EXPOSE <port-number>- this instruction sets configuration on the image that indicates a port the image would like to expose.USER <user-or-uid>- this instruction sets the default user for all subsequent instructions.CMD ["<command>", "<arg1>"]- this instruction sets the default command a container using this image will run.
Dockfile 使用
下面我们根据官方提供的示例来看看 Dockerfile 的使用。
|
|
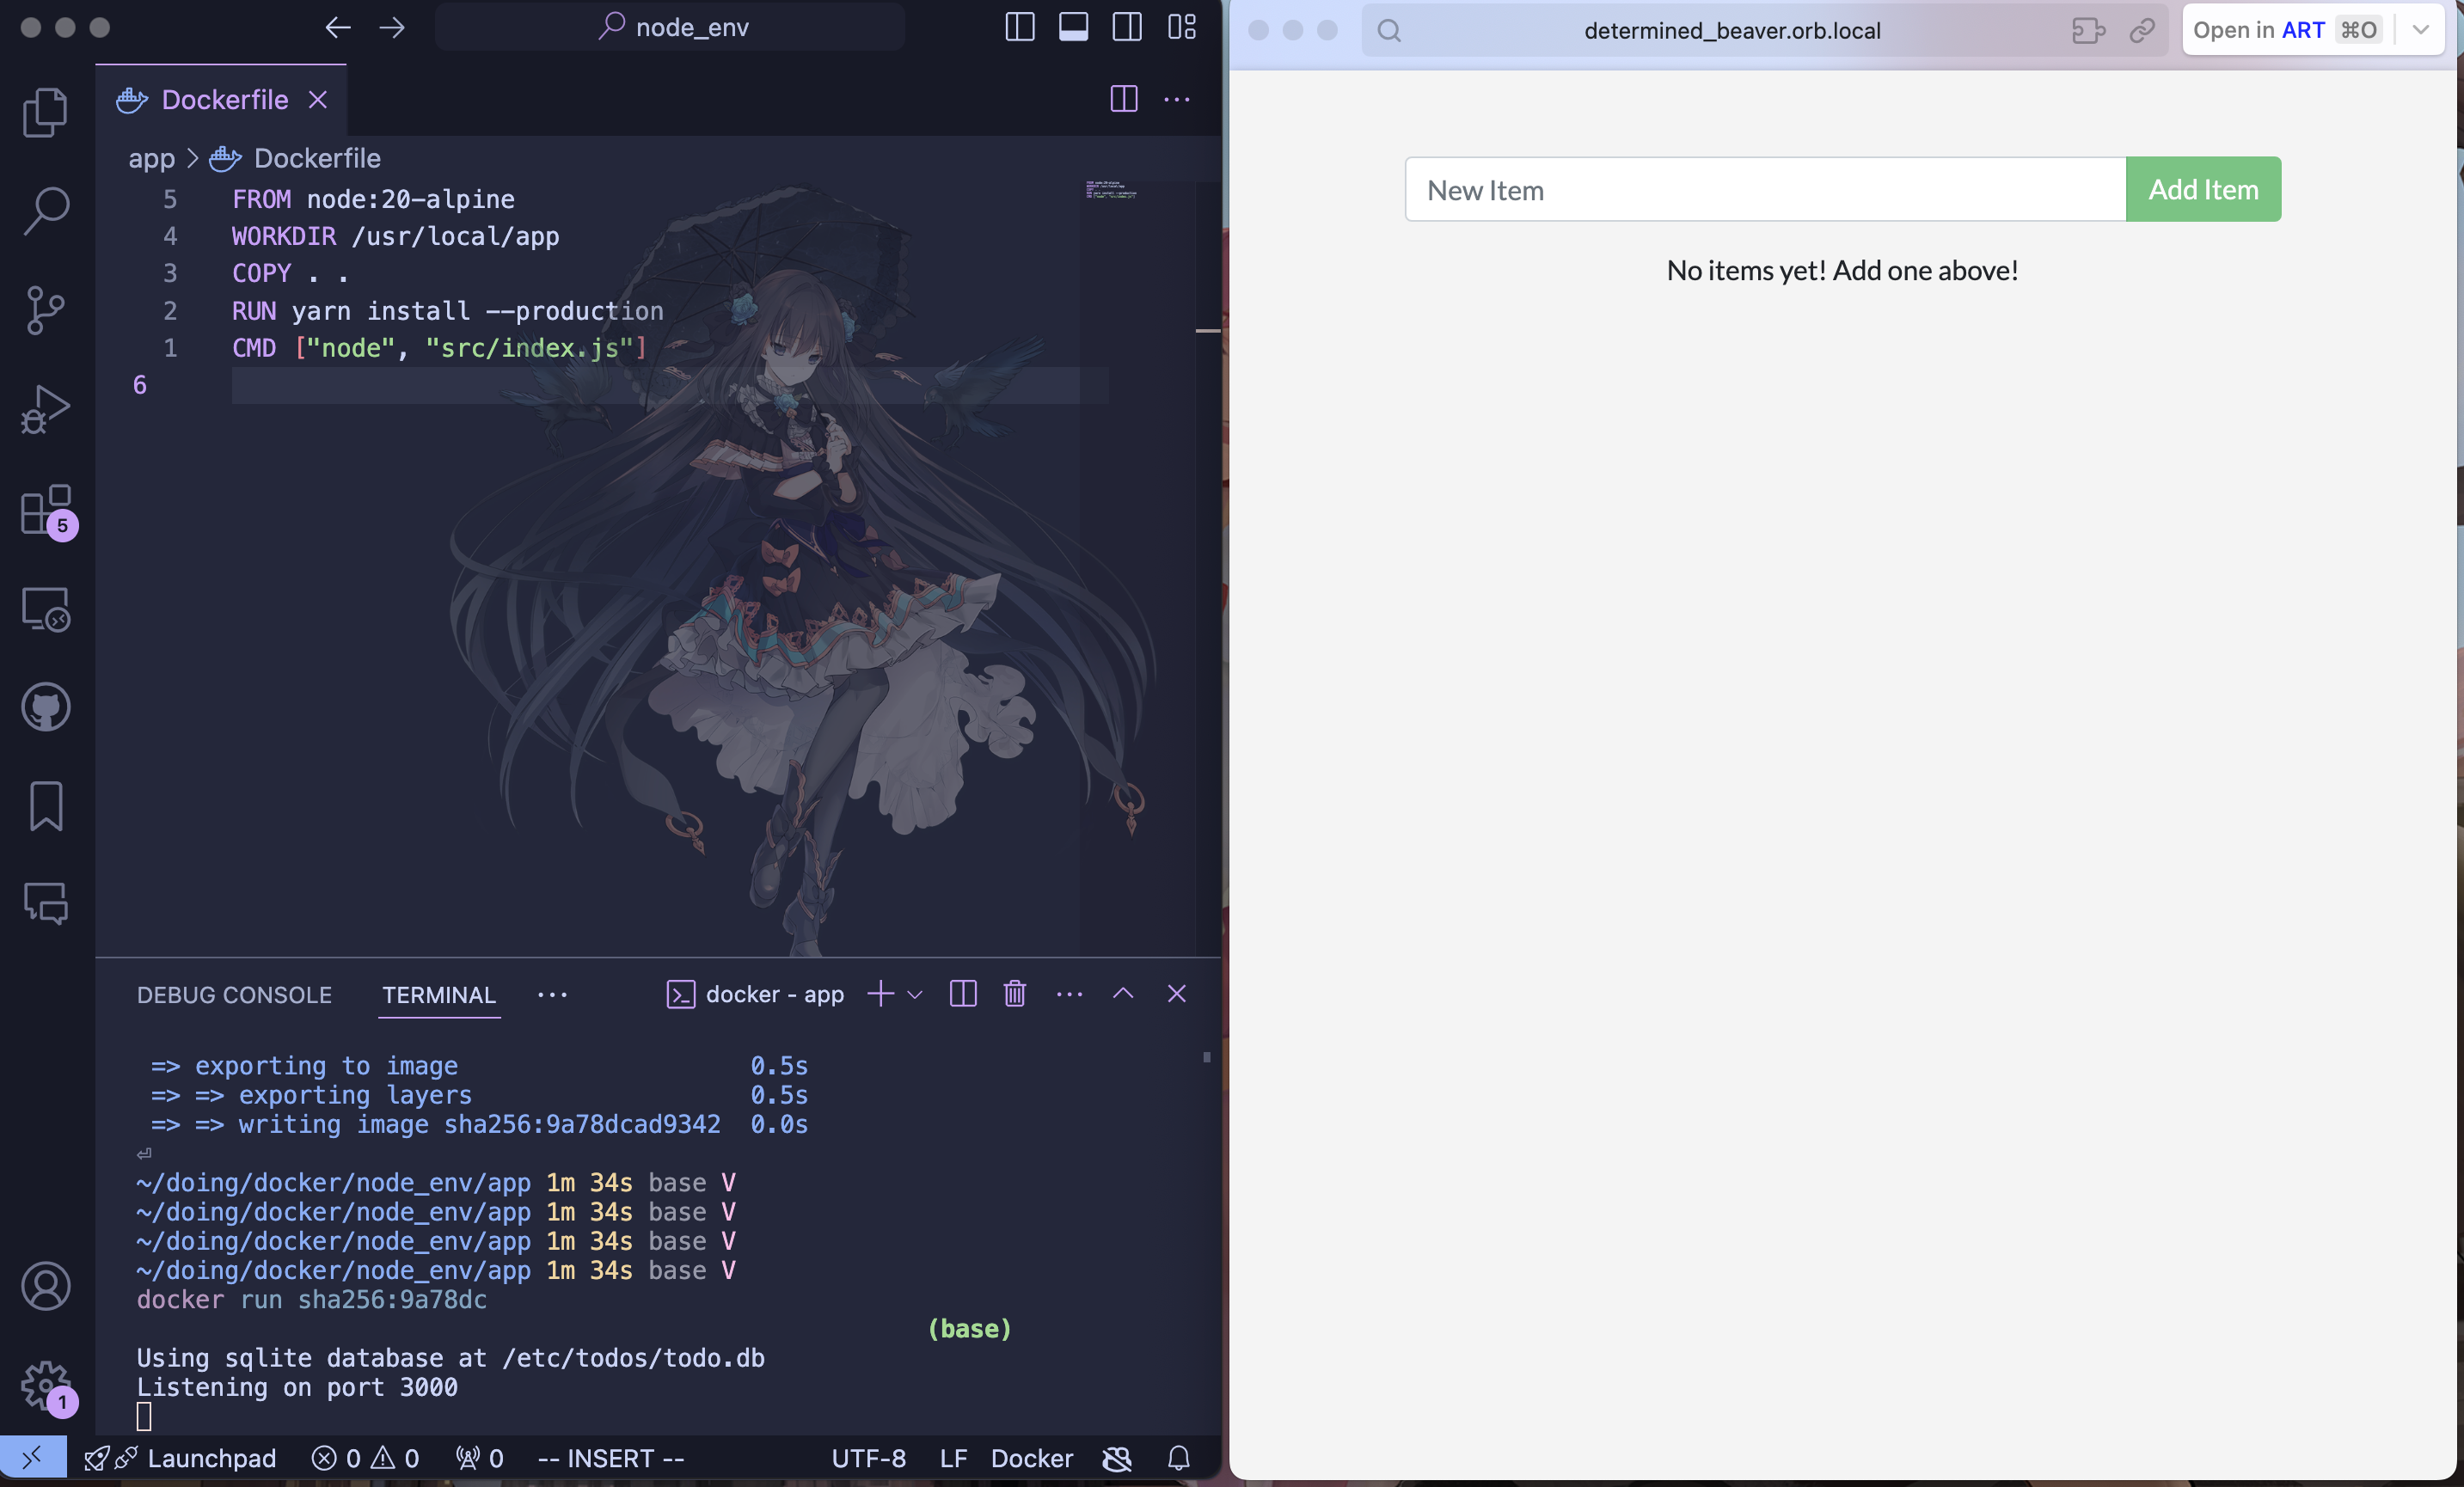
后在终端中定位到 Dockerfile 的同级目录下使用 docker build . 命令会得到以下输出:
|
|
最后会得到 sha256 的标识码,使用 docker run SHA256:.... 即可运行该镜像。
运行效果:
更为复杂的例子可以参考Docker 从入门到实践的这一个部分。
镜像发布
在前文中我们已经知道如何构建一个镜像,如若我们想把构建好的镜像发布到互联网上该如何做呢?我们继续浏览官方文档。在之前的实践中我们知道使用 docker build . 最后 Docker 会输出一串 sha256 的字符串用于标识我们构建的镜像。显然记忆 sha256 的字符是复杂的, 但在使用过程中我们必须能区分镜像,Docker 使用标签机制来解决这个问题。
Tagging images is the method to provide an image with a memorable name.
单一的标签可能会出现歧义的,为了减少歧义, Docker 采用了较为复杂的命名结构。结构如下:
[HOST[:PORT_NUMBER]/]PATH[:TAG]
HOST: The optional registry hostname where the image is located. If no host is specified, Docker’s public registry atdocker.iois used by defatult.PORT_NUMBER: The registry port numbers if a hostname is provided.PATH: The path of image, consisting of slash-separated components. For Docker Hub, the format follows[NAMESPACE/]REPOSITORY, where namespace is either a user’s or organization’s name. If no namespace is specified,libraryis used, which is the namespace for Docker Official Images.TAG: A custom, human-readable identifier that’s typically used to identify different versions or variants of an image. If no tag is specified,latestis used by default.
如果想在镜像构建的前中标记镜像,可以使用如下命令:
docker build -t my-username/my-image .
如果镜像已经构建完成后想要标记镜像。则可以使用如下命令:
docker image tag my-username/my-image another-username/another-image:V1
至此,我们已经为镜像的发布做好了所有的准备工作。使用命令
docker push my-username/my-imgae
即可将我们构建好的镜像发送到指定的 Registery。 这里只是将镜像构建发布的流程记录下来,实际操作过程中还涉及到一些细节如身份验证等问题。详情请参考官方的小例子。
参考
Docker 官方文档: click
Docker 从入门到实践: click